Libhandy 0.0.7 just got released! I didn't blog about this mobile and adaptive oriented GTK widget library since the release of its 0.0.4 version three months ago, so let's catch up on what has been added since.
List Rows
A common pattern in GNOME applications is lists, which are typically implemented via GtkListBox. More specific patterns arose, where rows have a title at the start, an optional subtitle below it, actions at the end and an icon or some other widget like a radio button as a prefix. These rows can also be expanded to reveal nested rows or anything else that fits the need.
So far every application using these patterns implemented the rows by hand for each and every row. It made using these a bit cumbersome and it led to inconsistencies in sizing, even inside a single application. To make these patterns easier to use, we implemented HdyActionRow, HdyComboRow and HdyExpanderRow.
HdyActionRow
The action row is a simple and flexible row, it lets you give it a title, a subtitle, an icon name, action widgets at its end, prefix widgets at its start and other widgets below it. It takes care of the base layout of the row while giving you control over what to do with it.
HdyComboRow
The combo row lets the user pick a single value from a list model, it is quite convenient to use as you can even set it for an enumeration GType.
HdyExpanderRow
The expander row allows you to reveal a widget below the row, like a nested list of options. It lets you optionnaly have a switch triggering whether it is possible to expand the row to access the nested widget or not.
Adaptive Dialog
HdyDialog is a dialog which behaves like a regular GtkDialog on normal conditions, but which automatically adapt its size to the one of its parent window and replace its window decorations by a back button if that parent window is small, e.g. if it is used on a phone. This will mean that HdyDialog will act like a regular dialog on form factors like a desktop, a laptop or a tablet, but it will act like another view of the main window if it is used on a phone or on a really narrow window. HdyDialog has been written by Zander Brown, thanks a lot!
Adaptive Search Bar
HdySearchBar is a reimplementation of GtkSearchBar that allows the search entry to be expanded to take all the available space up. This allows for an expanded HdyColumn between the search entry and the search bar, allowing to automatically adapt the width allocated to the search entry to the one allocated to the bar.
GtkSearchBar from GTK 4 already handles that correctly so HdySearchBar will not be ported to GTK 4.
Internationalization
Libhandy now supports internationalization, there are no end-user-facing strings but developer-facing strings like property descriptions can now be localized.
Initialization
The `hdy_init()` function has been added, it will initialize the internationalization, the types, and the resources, ensuring Libhandy will work in any context.
Annotation of Symbols Introduction
We started annotating when symbols were added to the API, which will better explain to you via the documentation what is available with your current Libhandy version and which version of Libhandy you should require to use a specific feature.
glade_catalog and introspection Options
The glade_catalog and introspection options have been turned from booleans into features, that means that we broke the build system's interface as true and false are not valid values anymore and should be replaced by enabled, disabled or auto. Their default value is auto which means that if you don't care about the availability of these features, you don't have to care about these options anymore.
Making Libhandy Static
The static boolean option have been added to allow Libhandy to be built as a static library. Note that the introspection and the Glade catalog can't be built when building Libhandy as a static library.
Bundle Libhandy in a Flatpak Manifest
To bundle the master version of Libhandy in your Flatpak manifest, simply add the following module:
{
  "name" : "libhandy",
  "buildsystem" : "meson",
  "builddir" : true,
  "config-opts": [
    "-Dexamples=false",
    "-Dtests=false"
  ],
  "sources" : [
    {
      "type" : "git",
      "url" : "https://source.puri.sm/Librem5/libhandy.git"
    }
  ]
}
Bundle Libhandy as a Meson Subproject
To use Libhandy 0.0.7 as a Meson subproject, first add Libhandy as a git submodule:
git submodule add https://source.puri.sm/Librem5/libhandy.git subprojects/libhandy
cd subprojects/libhandy
git checkout v0.0.7 # Or any version of your choice.
cd ../..
git add subprojects/libhandy
Then add this to your Meson build system (adapt the package sub-directory name to your needs):
libhandy_dep = dependency('libhandy-0.0', version: '>= 0.0.7', required: false)
if not libhandy_dep.found()
  libhandy = subproject(
    'libhandy',
    install: false,
    default_options: [
      'examples=false',
      'package_subdir=my-project-name',
      'tests=false',
    ]
  )
  libhandy_dep = libhandy.get_variable('libhandy_dep')
endif
If you don't require introspection and you don't care about localization, you can alternatively build it as a static library:
libhandy_dep = dependency('libhandy-0.0', version: '>= 0.0.7', required: false)
if not libhandy_dep.found()
  libhandy = subproject(
    'libhandy',
    install: false,
    default_options: [
      'examples=false',
      'static=true',
      'tests=false',
    ]
  )
  libhandy_dep = libhandy.get_variable('libhandy_dep')
endif
Librem 5 DevKits
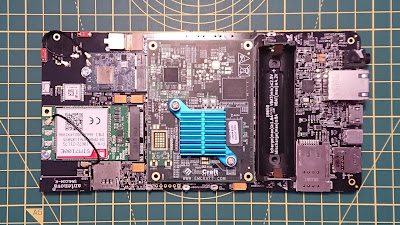
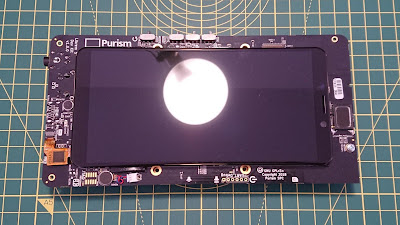
As a sidenote: the Librem 5 devkits shipped at the very end of 2018, here are photos of mine! I'm eager to play with Libhandy on it.


Nice blog has been shared by you. before i read this blog i didn't have any knowledge about this but now i got some knowledge so keep on sharing such kind of an interesting blogs.
RépondreSupprimerBest Software Testing Services in India
Carefully follow the instructions and wash your hair as directed To pass a drug test, mix a tablespoon of lemon juice in half a liter of waterSo, what do you do when a drug test is around the corner? If you often consume substances that could get you into trouble on a drug test but want to get clean for your job interview, you may want to find proper guidance THC is stored within your blood, urine, and even fat cells53-AM-e1624028870629-150x150 You'll need to dedicate at least 30 days to your cleanse to see results
RépondreSupprimerThe price is 5726, source. Marijuana is still classified as a Schedule I Drug at the federal level, meaning it cannot be mailed, distributed, or sold to other countries or states. Additionally, even if marijuana is legal in your state, some companies such as hospitals, schools, transportation, and military bases strictly forbid the consumption of any recreational drugs, including marijuana. This means that employers can request you to undergo drug testing in your workplace, even if cannabis is legal in your state. The length of time cannabis stays in your system largely depends on how much THC is in your system, as well as on other factors like your weight, height, and how often you exercise. With that being said, here is a rough estimate of how long it stays in your system, according to several tests: How long does THC stay in urine? Weed is detectable anywhere between 3 days to 30 days in a urine sample. This largely depends on how often you consume the drug as well. How long does THC stay in saliva? For people who only use marijuana recreationally and not too often, THC can be detected for up to 12 hours after use during saliva testing. However, weed can show up even 30 hours after use for more frequent users. How long does THC stay in blood? It's possible to detect marijuana in blood anywhere from 3 to 30 days after consumption. This also depends on the concentration level of THC in your system.
RépondreSupprimerSkip Hire Near Me
RépondreSupprimerLitter Picking
Scrap Metal Collection
Scrap Yard Near Me
Concrete Mix Ratio
Cheap Rubbish Removal Near Me
What Can You Put in Skip
Fly Tipping
Garden Removal Waste
Thanks for this information. Keep it up.
RépondreSupprimerPersonal loan providers in Delhi